The Power of Self-Confidence: How Believing in Yourself Boosts Mental Health

The Power of Self-Confidence: How Believing in Yourself Boosts Mental Health

Self-confidence has an incredible impact on our overall well-being, from influencing how we interact with others to shaping the very way we see ourselves. At the core of mental health lies a sense of self-worth, and self-confidence can be a powerful tool to boost it. It’s no wonder that many people actively seek ways to enhance their confidence, whether through personal development or aesthetic treatments like CO2 laser treatment and jaw filler. This article will delve into the ways self-confidence enhances mental health, explore how self-esteem and self-belief are cultivated, and highlight the steps that can help in building a stronger, more resilient self-image.

An image of a womans face before and after having CO2 laser treatment

The Link Between Self-Confidence and Mental Health

A strong connection exists between how confident we feel and the state of our mental health. When people believe in themselves, they’re more likely to take on challenges, stay resilient under stress, and develop healthier relationships. The benefits of self-confidence ripple outwards, positively impacting areas such as productivity, happiness, and social life.

Poor mental health is often associated with low self-esteem, a sense of inadequacy, and persistent self-doubt. When confidence is low, daily struggles feel more daunting, and the fear of failure can lead to isolation and avoidance of new experiences. On the other hand, when self-confidence grows, it can provide a buffer against stress, enabling a more balanced response to life’s difficulties. Confident individuals tend to feel less anxious and more in control of their lives, which leads to better emotional resilience and a reduced likelihood of developing conditions like anxiety or depression.

Self-Image and Aesthetic Choices

In today’s world, people have more options than ever to enhance their appearance, with aesthetic treatments playing a unique role in boosting self-confidence. Treatments like CO2 laser treatments and jaw fillers offer opportunities to address perceived imperfections and provide a sense of empowerment over one’s appearance. While aesthetic treatments alone don’t directly build confidence, they can help individuals feel more comfortable in their skin, which can translate to a positive self-image and improved mental well-being.

For example, CO2 laser treatment is popular for skin rejuvenation, helping people to reduce fine lines, scars, and other imperfections. Many find that by addressing these issues, they feel more presentable and self-assured, leading to a boost in confidence. Similarly, jaw fillers can enhance facial structure, creating a stronger jawline that often aligns with the individual’s ideal self-image. When people feel they look their best, it can positively impact their interactions with others and allow them to step into social and professional situations with greater assurance. This enhanced self-image can feed into a virtuous cycle of self-confidence and well-being.

Practical Ways to Build Self-Confidence

While aesthetic choices can be helpful, true self-confidence is largely built from within. Here are some effective ways to build self-confidence and, in turn, improve mental health:

  1. Set and Achieve Small Goals: Confidence grows through accomplishments, even minor ones. By setting realistic, achievable goals, you reinforce your ability to succeed, which builds self-trust and resilience over time. Completing tasks, no matter how small, can have a lasting positive effect on your self-belief.
  2. Practice Positive Self-Talk: The way we speak to ourselves can greatly impact our self-image. Shifting from critical to positive self-talk, replacing statements like “I can’t” with “I’ll try” or “I am capable,” helps retrain the brain to think more optimistically. This adjustment in perspective encourages a healthier, more supportive inner dialogue, leading to increased confidence.
  3. Invest in Self-Care and Appearance: Taking pride in your appearance doesn’t mean vanity. It’s a matter of self-respect. For some, this might mean developing a skincare routine, while others might seek aesthetic enhancements like CO2 laser treatments or jaw fillers. When individuals feel good about how they look, it can have a profound effect on their self-assurance, allowing them to face the world with renewed confidence.
  4. Surround Yourself with Positive Influences: People around us have a significant impact on our mental health. Building a support network of friends, family, and mentors who encourage growth and resilience helps reinforce self-worth and offers positive reinforcement in times of doubt.
  5. Challenge Limiting Beliefs: Many people have internalised limiting beliefs that hold them back, such as “I’m not good enough” or “I don’t deserve success.” Identifying and challenging these thoughts can be empowering. By proving to yourself that these beliefs are untrue, you open the door to new possibilities and a greater sense of self-assurance.
  6. Practise Mindfulness and Gratitude: Mindfulness, the practice of being fully present, helps quiet the mind and provides clarity. Similarly, gratitude is linked to higher self-esteem; acknowledging positive aspects of oneself and life can lead to a stronger sense of identity and confidence.

Self-Confidence as a Journey

Self-confidence isn’t an end goal but a continuous journey. It requires self-acceptance, persistence, and the understanding that setbacks are part of personal growth. Building confidence can be challenging, especially in a world that often focuses on external achievements and perfectionism. However, by prioritising inner growth, taking pride in personal achievements, and embracing self-compassion, people can build lasting self-confidence that transcends temporary feelings of doubt.

For those considering aesthetic treatments like CO2 laser treatment or jaw filler, these can be valuable tools to complement the internal work of building self-esteem. Many individuals find that combining aesthetic improvements with personal growth initiatives enhances their overall confidence in a way that feels authentic and self-empowered.

The Long-Term Benefits of Self-Confidence

Self-confidence and mental health are closely intertwined, and building self-confidence brings benefits that extend well beyond improved mental well-being. People with higher self-confidence often achieve greater personal and professional success, have healthier relationships, and maintain a more positive outlook on life. Confident people are typically more resilient in the face of challenges, equipped with the inner strength to overcome adversity.

Moreover, self-confidence can lead to a ripple effect, inspiring those around you. Confident individuals often become role models, and by displaying self-belief and authenticity, they encourage others to pursue their own growth and confidence journeys. The ripple effect of self-confidence can strengthen communities and promote a culture of mutual support and positivity.

An image of a woman having a jaw filler injection

Final Thoughts

Self-confidence is a transformative quality that goes hand-in-hand with good mental health. By believing in yourself and taking small steps toward self-assurance, you can build a foundation for resilience, happiness, and personal fulfilment. For some, aesthetic choices like CO2 laser treatments and jaw fillers can support this journey by enhancing self-image, but the true power of confidence is cultivated from within.

In a world that is constantly changing, a confident mindset is a stable and empowering asset. By nurturing self-confidence, you’re not just improving your mental health but investing in a more fulfilling, resilient life. Whether through internal growth, support networks, or aesthetic enhancements, the journey to self-confidence is worth every step, empowering you to face life’s challenges with strength, optimism, and unwavering self-belief.

*This is a guest post

Get Creative Together: Fun and Simple Ways to Spark Imagination and Connection at Home

Get Creative Together: Fun and Simple Ways to Spark Imagination and Connection at Home

Image of Toddler sitting on a wooden climbing toy


In today’s fast-paced world, finding quality time to spend with your family can sometimes feel like a challenge. But with a little imagination and a few simple activities, you can create memorable moments that entertain and educate you. One of the most rewarding ways to bond with your children is through imaginative play and hands-on activities. With early years toys and creative setups like a Childrens picnic table, you can spark creativity while nurturing essential skills—all from the comfort of your home.

The Power of Imaginative Play

Imaginative play is more than just a way for children to pass the time. It helps develop cognitive skills, fosters emotional understanding, and allows kids to express themselves in ways they might not with words. For parents, joining in on these moments creates opportunities to connect with their child on a deeper level, seeing the world through their eyes, whether it’s setting up an elaborate pretend tea party with their favourite early years toys or building a secret fort using pillows and blankets, imaginative play taps into the heart of a child’s learning journey.

Early Years Toys: More Than Just Playthings

When we think of toys, it’s easy to view them simply as amusement items. However, for young children, toys serve as tools for learning and development in their early years. From colourful building blocks to miniature animals, these toys ignite curiosity and encourage problem-solving. For example, playing with blocks may seem like a simple activity, but it helps to develop spatial awareness, fine motor skills, and the basics of geometry. Engaging with toy animals or action figures, on the other hand, introduces storytelling, role-playing, and empathy as children create their own narratives.

One fun activity to try at home is setting up a mini “town” or “farm” on your children’s picnic table using their early years toys. Your child can use toy cars, figures, and blocks to create roads, buildings, and characters, while you join in and take part in the storyline. This kind of role-playing encourages not only creativity but also communication skills as they share their ideas and problem-solve when building their imaginary world.

Outdoor Fun with a Children’s Picnic Table

Two children sitting at a wooden picnic bench doing some colouring

If the weather permits, take the creativity outside! A children’s picnic table is the perfect setting for numerous activities that foster family bonding and imaginative play. In addition to its practical use as a place to eat or do crafts, the picnic table can easily transform into the hub of creativity.

You might start with a simple outdoor craft project, like painting stones or creating leaf rubbings. Children love the tactile nature of these activities, and they offer great educational benefits, too—introducing basic concepts of colour, shape, and nature. You can even extend the fun by hosting an outdoor “art show” where your children proudly display their creations on the table.

Alternatively, the children’s picnic table can serve as the setting for a family picnic, complete with imaginative play scenarios. Let your child “serve” food using pretend tea sets or play with a market setup using their early years toys. Activities like this combine the fun of role-play with real-life learning experiences, teaching concepts such as sharing, manners, and cooperation.

Building Stronger Connections Through Play

The best part about engaging in creative activities with your family is the connection you build. These moments offer a chance for parents to engage in their child’s world and create memories that last a lifetime. Activities like storytelling, pretend play and craft-making allow for real, meaningful interaction. The joy children feel when their parents join in on their playtime strengthens their emotional bonds and boosts their self-esteem.

Moreover, these activities have educational benefits, helping children develop language skills, improve concentration, and even gain confidence in problem-solving. Early years toys provide a wonderful starting point for these learning experiences, and with the flexibility of a children’s picnic table as a workspace, the possibilities for fun are endless.

Conclusion

Creating an environment at home that encourages imaginative play not only enhances your child’s development but also brings your family closer together. Using early years toys and simple setups like a children’s picnic table, you can foster creativity, build communication skills, and, most importantly, enjoy time spent together. With a bit of imagination and a willingness to dive into your child’s world, you can make learning fun and create moments of joy that your family will cherish for years to come.


*This is a guest post by TP Toys.

Mastering the Art of Hosting a Dinner Party

Mastering the Art of Hosting a Dinner Party

 Image of a table set for a dinner part

Looking to host a dinner party that leaves a lasting impression? You’ve come to the right place! Our ultimate guide will take you through every step of the process, from planning a mouth-watering menu to creating the perfect atmosphere.

Whether it’s an intimate gathering or a grand celebration, we’ll help you craft an unforgettable experience that strengthens relationships and showcases your culinary skills. Dive in and discover how to make your dinner party the talk of the town!

To ensure your dinner party is flawless, consider using an event planning checklist. From confirming guest lists and dietary preferences to planning the timeline for food preparation and setting the table, a well-structured checklist can be your secret weapon for hosting success.

Step 1: Planning the Perfect Menu

Your menu sets the tone for the entire evening. It should be diverse enough to cater to various dietary needs and preferences while remaining cohesive.

Catering to Dietary Needs

Before you plan your menu, ask your guests if they have any dietary restrictions. This could include allergies, intolerances, or lifestyle choices such as veganism or gluten-free diets. Knowing your guests’ needs will help you design a menu that everyone can enjoy.

Balance and Variety

Aim for a balanced menu that includes a mix of proteins, vegetables, and carbohydrates. Offer both meat and vegetarian options to ensure there’s something for everyone. For example, you could serve a rich beef stew alongside a hearty vegetable lasagna or a Turkey Cacciatore.

Seasonal Ingredients

Using seasonal ingredients can elevate your dishes and ensure everything tastes fresh. For example, a summer menu might feature grilled vegetables and a light citrus salad, while a winter menu could include root vegetables and warming stews.

Dessert

Don’t forget dessert! Try serving White Chocolate Strawberry Cheesecake Cups for a sweet treat that will delight your guests.

An image of salmon fillets cooked with a herb dressing

Step 2: Setting the Scene

Creating the right ambiance is key to making your guests feel comfortable and setting the mood for the evening.

Table Settings

Your table setting should be both functional and beautiful. Use quality dinnerware, cutlery, and glassware. Add a touch of elegance with cloth napkins and a tablecloth. Consider using place cards to avoid any awkward seating arrangements.

Lighting

Lighting plays a crucial role in setting the mood. Soft, warm lighting is generally more inviting. Candles can add a touch of romance and intimacy, while fairy lights or lanterns can create a whimsical atmosphere.

Decor

Less is often more when it comes to decor. A beautiful centerpiece, like a vase of fresh flowers or a bowl of seasonal fruits, can be enough. Ensure that any decorations don’t obstruct your guests’ view or take up too much space on the table.

Step 3: The Invitations

Crafting the perfect invitation sets the tone for your event and helps manage RSVPs effectively.

Crafting the Invitation

Your invitations should reflect the theme and formality of your dinner party. For a casual gathering, a simple email or text may suffice. For more formal events, consider sending printed invitations. Be sure to include all essential details such as date, time, location, dress code, and RSVP instructions.

Managing RSVPs

Managing RSVPs is crucial for planning purposes. Set a clear deadline for responses and follow up with any guests who haven’t replied. This will give you an accurate headcount and help you plan seating arrangements and food quantities.

Communication

Maintain open communication with your guests. Send a reminder a week before the event and provide any additional details they might need, such as parking information or special instructions.

Step 4: Preparation and Cooking Schedule

A well-thought-out preparation and cooking schedule can make the difference between a stressful evening and a seamless one.

Planning Ahead

Start preparing as early as possible. Create a checklist of tasks that need to be completed and assign deadlines. This might include shopping for ingredients, setting the table, and preparing any dishes that can be made in advance.

Cooking in Advance

Prepare as much as you can before the day of the party. Many dishes, such as soups, casseroles, and desserts, can be made a day or two in advance. This will free up your time on the day of the event and allow you to focus on last-minute details.

The Day Of

On the day of the party, stick to your schedule as closely as possible. Allow extra time for unexpected delays. Keep your kitchen organised and clean as you go to make the process smoother.

Step 5: Keeping Children Quiet During Your Event

An image of a jar of wax crayons with a hand drawing on paper

While hosting a party, ensuring that children remain quiet and occupied can be challenging but manageable with a few strategic preparations.

Create a Kid-Friendly Zone

Designate a separate area specifically for children to play and socialise. This space should be equipped with toys, games, and activities that can keep them entertained for hours. Consider including colouring books, building blocks, or interactive video games suitable for their age groups.

Hire a Babysitter

If possible, hire a professional babysitter to supervise the children. This allows adults to enjoy the event without frequently attending to the kids. The babysitter can organise fun activities, keep an eye on safety, and manage any issues that may arise.

Plan Age-Appropriate Activities

Organise structured activities that cater to the children’s interests and energy levels. Crafts, storytime, or scavenger hunts can keep their attention and provide a playful distraction. These activities can be both fun and educational, helping children stay engaged.

Establish Ground Rules

Set clear ground rules for children’s behaviour during the event. Communicate these rules to both the children and their parents at the beginning. Simple guidelines such as indoor voices, no running, and staying in designated areas can help maintain order.

Include Family-Friendly Entertainment

Incorporate entertainment that appeals to both children and adults, such as a magic show, puppet theatre, or interactive storytelling session. This can create a shared experience and keep the children quietly engaged.

By considering the needs and interests of the younger guests, you can create an environment where children remain quiet and entertained, allowing everyone to enjoy the event to its fullest.

Step 6: Hosting the Party

Once your guests arrive, your main goal is to ensure they feel welcome and the evening runs smoothly.

Warm Welcome

Greet each guest personally as they arrive. Offer them a drink and introduce them to other guests if necessary. A warm welcome sets the tone for the entire evening.

Smooth Flow

Keep the evening flowing smoothly by managing the timing of each course. Aim for a relaxed pace that allows for conversation without leaving guests hungry. Be attentive but not intrusive, checking in with guests regularly to ensure they have everything they need.

Enjoy Yourself

Remember, your guests are there to spend time with you. Once the meal is served, take the time to sit down, relax, and enjoy the evening. Your enthusiasm and enjoyment will be contagious.

Step 7: Post-Party Follow Up

The party doesn’t end when the last guest leaves. Following up can leave a lasting impression and show your appreciation.

Thank-You Notes

Send a thank-you note to each guest within a few days of the party. This can be a simple email or a handwritten note, depending on the formality of the event. Express your gratitude for their attendance and any contributions they may have made.

Gathering Feedback

Ask for feedback to improve future events. This can be done informally through conversations or more formally through a quick survey. Understanding what worked and what didn’t will help you host even better parties in the future.

Stay Connected

Keep the connection alive by sharing photos from the evening or a recap of memorable moments. This helps build a sense of community and keeps the good vibes going.

Conclusion

Hosting a successful dinner party is a rewarding experience that combines culinary skills, organizational prowess, and a touch of hospitality. By planning carefully, creating the right ambiance, and ensuring your guests feel welcome, you can create an evening that’s enjoyable for everyone, including yourself. Ready to host your next dinner party? Start planning today and experience the joy of bringing people together over a delicious meal.


How to get the Best Freebies with Freebie Empire

How To Get The Best Freebies?

My addiction of filling my mailbox with freebie offers began at an early age. My mother would usually find me cutting out freebie coupons and begging for another stamp to post the letter. The best part of the day for me is the time when the mailman would arrive. In fact, I was so eager to see what I have received as a freebie on that particular day. Even today, nothing has changed much. In fact, I am still a “freebie-oholic.” I am excited when I see freebies in my mailbox and love to share them with my friends and family.

How to get the best freebies online with Freebie Empire


Are you ready to fill your mailbox with hundreds of freebie offers? The latest technology allows you to collect freebies without clipping coupons or mailing the free offers. There are multiple websites that offer freebies – which you can easily sign-up for. These sites will keep you posted on the latest freebie offers on the market.


Here are three of the best places to find freebies on the internet:


  1. “Freebie Empire” is a website that offers a full list of freebies almost on a daily basis – check out their website at https://www.freebieempire.co.uk/


  1. “Shop 4 Freebies” is another great site that is dedicated to bringing the best free samples, products, coupons, and bargains from some of the best brand names in the country – check out their website at http://www.shop4freebies.com.


  1. “Freebies 4 Mom” is a site that gives you free samples using coupons, winning sweepstakes, and giveaways – check out their site at http://freebies4mom.com.


Important Freebie Tips For Beginners

. Never give out your credit card details or social security number when applying for a freebie. It may place you at risk and result in identity theft. Wendi Caetta of TheFreebieBlogger.com says that if the freebie is free, it shouldn’t require any payment at all. Hence, you don’t have to give out your financial information to them. You should also note that there are legitimate websites that offer freebies when you sign up for a trial offer from the company. For instance, there are freebies such as cereal bar samples that you will get when you sign up for a credit monitoring service. Such offers may require your credit card details. Hence, you should be doing your research about the company that offers the freebie before signing up for the offer. Also, if you have to cancel an offer within 30 days to prevent spending money, it is not worth your time.

Don’t use an everyday e-mail address for freebie offers. Even if the offer is legitimate, you will be giving out your email address to a third party. Make sure to create a separate email address for such correspondence. If you create a Gmail address for this purpose, you can forward the messages to your main email account for free. In fact, you can then easily filter these messages into a folder and delete the second account if it receives too much spam.

Filling out copious forms is a waste of your precious time. For example, you click on a link for a sample body wash, and suddenly you are asked to join a movie club to qualify for the free offer. In fact, the best legitimate freebie offers require only your name and address most of the time. The worst ones will want you to sign up with rewards partners for a trial offer that would cost you money if you are not attentive enough. Even though you can cancel these offers before the 30-day period ends, you are more likely to forget that you signed up for them. That way your credit card will be charged the full amount for the product after the 30-day trial period. That is why you need to be careful to avoid such offers when signing up for freebie offers on the net.

* This is a guest post in conjunction with www.freebieempire.co.uk

How to Get Free Stuff – For Newbies

How to Get Free Stuff – For Newbies

There happens to be a wealth of free stuff that is available online, which is all up for grabs. This includes tangible items as well as digital goods, including free services and/or software. Companies are always gearing up to give away quality samples of their products, so if you are willing to give up some of your time to request these free goods, you will start to see items showing up in your mail box on a regular basis.

A Pinterest post on how to get free stuff for newbies with an image of free beauty samples

When you are thinking of getting started, it is best that you read this FAQ’s as it will give you lots of valuable information on freebies for newbies.

While working through ukprize.co.uk, you will see that we are completely family friendly, meaning that your security and safety will always be our number one priority. Everything that you find has been completely checked before hand to ensure that it is legit and we will never send out any unsolicited emails to our visitors. You will not even have to put in an email address prior to entry, all you have to do is surf your way in!

It is well worth it to follow us on both Facebook and Twitter so that you will get alerts whenever the new freebies come out.

Think about setting up a free, secondary email address.

Setting up this secondary email address will allow you to sign up for all of the freebies and newsletters that you want, without you having all sorts of emails inundating your regular email box. There can be a great deal of promotional information, coupons, newsletters and more that will come from the companies that you are requesting the freebies from. To easily solve this problem, all you have to do is sign up for a secondary account and it will keep your regular email box from getting completely cluttered. It will be well worth it for you to set up the new account and if you happen to enter a lot of contests and sweepstakes, this will be very helpful.

There must be some kind of a catch. How is all of this stuff free?

There is a catch to this, but it is something that is not bothersome in any way. The catch will be that you will usually have to opt in to get information sent to your email box, which will put you on a mass mailer list. If you want to be able to get a real life freebie sent to your home, you will also have to give out your address for delivery of the sample products. For the most part, people who sign up for a lot of freebies will not have a major issue with getting all sorts of junk mail at their homes after the sign up process. Keep in mind that not all websites are going to be fully safe, even if they say that they are. It is always best that you remain cautious. If an offer looks like it is too good to be true, it probably is.

Will you be getting spammed? Probably not, especially because the websites that we list are vetted before hand and swear off spamming. Spam is basically unsolicited email contact and none of the sites that we list do this.

How long is the wait time? Well, it will depend on what companies are sending out and if they have a set schedule for sending out their freebies. For the most part, you will see that the normal timeframe is about 28 days, with some occasions that may call for a bit longer wait time. Some samples will even arrive as early as one week after submission of your request.

There can be some instances where you and someone else that you know signed up fro the same samples, yet only one of you received one. This could be due to any number of reasons. Some companies will only have a certain supply of samples to send out. Once they are out, they will not be able to send anything else out, even if they had requests. The key here is to keep trying, as a lot of companies will replenish their supplies and then the freebies will start getting sent once again.

*This is a sponsored post


Recipe: Red Velvet Pancakes

Red Velvet Pancakes

I wish I could take credit for these Red Velvet Pancakes, but this recipe has been put together by the Chef’s at Gousto.

Recipe for making Red Velvet Pancakes with photograph of pancakes topped with cream and chocolate shavings

Ingredients (Serves 2): 

For the pancakes:

  • 115g self-raising flour
  • 15g cocoa powder
  • 1 tsp baking powder
  • 1 tbsp honey
  • 2 eggs
  • 1 tbsp vegetable oil, plus extra for frying
  • 130ml milk
  • A couple of drops of red food colouring
  • 30g dark chocolate chips

For the cream cheese frosting:

  • 1.5 tbsp honey
  • 120g cream cheese

To serve:

Chocolate sauce and chocolate shavings

How To:

Step 1: Grab a bowl and mix together the flour, baking powder, cocoa powder, and a pinch of salt. Make a well in the middle of your dry ingredients and add the eggs, honey, veg oil, milk, and food colouring.

Step 2: Beat the wet ingredients together then stir in the dry ingredients until you have a batter. Don’t worry if there are a few lumps.

Tip: Don’t over-mix your batter! It will make your pancakes less fluffy (and no one likes a limp pancake).

Step 3: Heat some oil in a non-stick frying pan. Ladle in 1/6 of your batter then sprinkle a few chocolate chips on top. Cook for 2 minutes, or until bubbles form on top of the pancake, then flip over and cook for another 2 minutes until golden. Repeat with the remaining batter.

Tip: Use medium heat until the pan is hot, then reduce to a medium-low. Blasting the heat will burn your cakes (or crêpes). Once they’re cooked, keep them warm under a tea towel.

Step 4: While your pancakes cook, mix the cream cheese and remaining honey together. This is your sweet, cream cheese frosting.

Step 5: Serve your pancakes with a dollop of cream cheese frosting and a sprinkle of chocolate shavings. Then add a good drizzle of chocolate sauce over the stack. Enjoy!

More Pancake Tips from Gousto’s Senior Chef Jordan Moore:

  • Use a non-stick pan.
  • Add the mixture to a really hot frying pan.
  • Add a little more oil between cooking each pancake.
  • Use butter, coconut, or rapeseed oil for frying.
  • Spread the mixture out in the pan as quickly as possible.
  • Always add the liquid to the flour gradually, and keep whisking to avoid lumps.
  • When it comes to gluten-free flour, the best ones to use are rice, buckwheat, or coconut flour. For dairy alternatives for milk, you can use almond, rice, soya, or coconut milk.
  • If age-appropriate, adding protein like nuts and seeds to your pancake will help to maintain your blood sugar, keeping you fuller for longer.

Don’t forget to check out our other Pancake Recipes which include a Simple Pancake Batter, American Pancakes and Pancake Kebabs all of which are delicious.

Side Hustles Diary Week 2

Side Hustles Diary Week 2

Following on from last week, I’ve managed to list a few more things on Vinted and have had a few sales this week. I keep seeing Vinted hacks on TikTok and one of these is not to list everything at once, but to drip feed your listings so that they nudge the app towards you as and when you list new items.  This feels much more manageable anyway so I’m going to give this a go.

Side Hustles Diary Week 2

Money Savings Challenges

I’ve been putting money into the #365DayPennyChallenge but would like to start some others maybe for holidays and other bits that we want to do.

Swagbucks

I signed up for this a little while ago, but haven’t really done anything with it. However, this week I’ve downloaded some of the games. It makes a huge change from surveys which I’ve got really bored of doing.

I’m still on the waiting list for Prolific for surveys but still haven’t heard anything back.

Mystery Shopping

I signed up for www.proinsight.org which is a mystery shopping site, and straight away a task was available.

There’s a huge big building development close to me and the assignment is to make a phone call to book in an appointment and then make an appointment to visit the show homes. This job would pay £55 and it sounds great, but I was a bit nervous to take it in case I forgot the questions that I needed to ask. I’ll keep an eye on it to see what else is available and will let you know. If you fancy signing up for this

This Blog

I feel like there’s so much more that I can do with this blog. It has a good steady stream of traffic even when I feel like I’ve neglected it for a while so I’m sure that there are some opportunities that I could explore to make some additional cash.

Tracking my Side Hustles

I’ve set up my spreadsheet for this year and will update the tracker at the end of each month with any earnings I may have.

You can of course keep track of my Side Hustles by following me on TikTok and a list of all the Side Hustles I’ve tried so far you can find here.


Recipe: American Pancakes

American Pancake Recipe

This is the first time that I’ve tried and cooked American Pancakes so I’m looking forward to trying something new.

Simple American Pancake Recipe


What you will need:

  • 150g Plain Flour
  • 2 Teaspoons Baking Powder
  • 1/2 Teaspoon Bicarbonate of Soda
  • 35g Caster Sugar
  • 2 Large Eggs
  • 125mls Buttermilk
  • 25g Butter (melted)
  • Olive oil for frying
  • 8 Thick slices of streaky bacon
  • Maple Syrup

How to make American Pancakes:

Sift the flour, baking powder, and bicarbonate of soda into a bowl. Add in the sugar, mix, and make a well (hole) in the centre.

In a separate bowl whisk the eggs and add the buttermilk and melted butter.

Pour this into the well of the dry ingredients and gradually whisk together.

Put the batter in the fridge for about 30 minutes to an hour.

Heat a large frying pan and add a little bit of oil.

Spoon in dollops of the mixture making sure that there is a little bit of space between them. This will depend on the size of your frying pan.

Cook them for 1 – 2 minutes until they start to bubble on the surface, turn and cook on the other side until golden.

Keep them warm in the oven whilst you batch cook the rest of the pancakes.

In a separate pan heat 1 tablespoon of oil and fry the bacon rashers until crisp.

Serve the pancakes in a stack with crispy bacon and maple syrup on top.

Alternatively, you could have these with fruit and maple syrup as Ryan did.

If you enjoy Pancakes then maybe take a look at my Simple Pancake Recipe of these easy to make Pancake Kebabs which are great to make with the kids.

Simple American Pancake Recipe

*This post may contain affiliate links which means that I receive a small payment should you click the link and make a purchase at no extra cost to yourself.

White Chocolate & Strawberry Cheesecake Cups

White Chocolate & Strawberry Cheesecake Cups

White Chocolate and Strawberry Cheesecake Cups – What’s better than a recipe that you don’t have to cook. I’m pretty sure that I don’t know anybody who doesn’t like cheesecake or if I do they haven’t mentioned it. What’s not to like, Yummy creamy topping on an even yummier biscuity base (which if you’re the one serving you get to have extra – servers rights) and fruit. Fab combination!

Strawberry Cheesecake Cups RecipeWhat you will need:

For the filling

  • 150g White Chocolate
  • 25g Butter
  • 1/2 Teaspoon vanilla extract
  • 200g Cream Cheese
  • 25g Icing Sugar
  • 50mls Double cream, whipped
  • 1 Punnet Strawberries

For the base:

  • Half a pack digestive biscuits
  • 50g Butter, melted

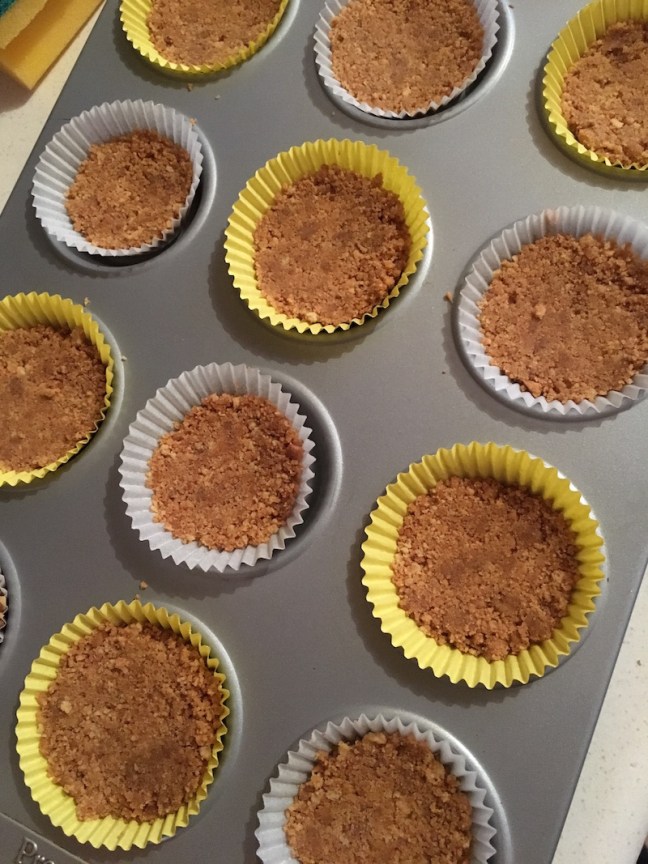
For the base, put the biscuits in a freezer bag and using a rolling pin crush the biscuits. Add the crushed biscuits to the melted butter.

Strawberry Cheesecake Cups Recipe

Put 12 cupcakes cases into a cupcake tray and add a spoonful of biscuit base to each case. Put into the fridge to chill whilst you prepare the topping.

Strawberry Cheesecake Cups Recipe

Melt the white chocolate, butter and vanilla extract in a heatproof bowl over a pan of simmering water. Making sure that the bowl doesn’t touch the water. Once all the ingredients are melted, take off the heat and stir to make a smooth mixture and set aside to cool.

Strawberry Cheesecake Cups Recipe

In another bowl add the cream cheese, icing sugar (sifted) and cream until smooth.

Add the chocolate mixture to the cream cheese mixture.

Strawberry Cheesecake Cups Recipes

Take about half the punnet of strawberries, wash and chop off the tops and cut into very small pieces before adding them to the cream cheese mixture.

Strawberry Cheesecake Cups Recipe

Top the biscuit base cases with the cream cheese mixture and put in the fridge for approximately 4 hours. Top each cheesecake cup with a quartered strawberry and serve.

And there you have lovely little scrummy White Chocolate & Strawberry Cheesecake Cups.

Strawberry Cheesecake Cups Recipe

Next time I make these I’m going to use Silicone Cupcake Cases so we can reuse them time and again.

Enjoy!

*This post contains items I have been gifted as well as affiliate links which means I receive a small payment if you make a purchase following one of my links at no extra cost to you.

Side Hustles Diary Week 1

Side Hustles Diary Week 1

If you’ve been following me recently you will know that I’ve been dabbling in side hustles to see if I can make some extra money. If you weren’t aware then pop over to my TikTok Account to see what Side Hustles I’ve been trying.

You can see the full list of Side Hustles that I’ve been trying – Some of which are great and other’s haven’t worked for me which I will keep updated as I find new ones.


So this week I’ve been cracking on with the decluttering that I started a while ago. It’s amazing how much stuff we have that we haven’t used for ages or had completely forgotten about. We’ve done some sorting and some of it will be going on Vinted and Facebook Market Place, some to charity shops and some will need to go to the tip.

I’ve got a bit bored of doing surveys, but will keep an eye on them and do the odd one when I have a spare few minutes.

Money Savings Challenges

I’ve restarted the #365daypennychallenge and am planning to complete this by the end of November so that we can use it at Christmas. You can print off the FREE tracker sheet here – #365pennychallenge

I’m going to start some other money saving challenges as well, but haven’t quite decided what these are going to be yet.

As well as making money, we’re going to be more mindful in our spending so that we can use the money on experiences and family time rather than random ‘stuff’. So meal planning is one of the ways we’re going to do this. Aside from the money saving, it does a lot for the sanity when you don’t have to decide daily what you’re going to cook every day. This can be as simple as writing it down on a piece of paper, or you can download my Meal Planner Pack and either fill in online or print off and stick on your fridge.

Tracking my Side Hustles

Every month I’m going to track the money made from side hustles. I need to do this for tax purposes as a self-employed person, and if side hustles are something you’re considering then make sure you find out about any taxes you will need to pay.

I’m going to track my earnings using the Side Hustles Savings Tracker I bought from Savvy Jamie which is currently £4.

That’s it for this week as it’s the first full week that the kids have been back at school so it’s been a bit hectic.

I would love to know how you make additional income.